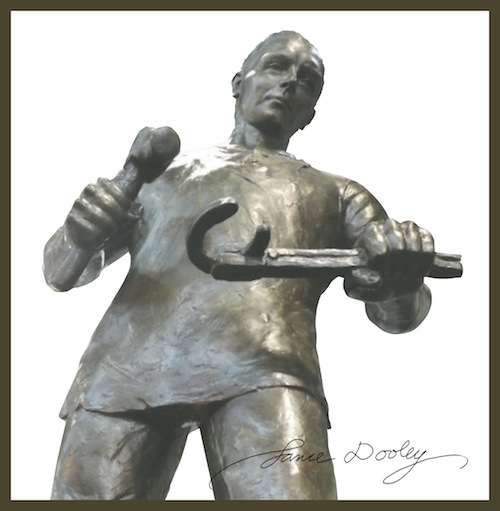
ET Pybus Bronze Sculpture ~ "Man of Steel", Unveiled Dec 21, 2013
The ET Pybus Sculpture Project was conceived in January 2013.
The goal of this project is to commemorate and honor ET Pybus, the well known metal magnate of the early to mid 20th Century.
The story of ET Pybus is a story of success and he was referred to as the Steve Jobs of Wenatchee Valley.
See this article:
E.T. Pybus: The Steve Jobs of Wenatchee

From humble beginnings, Elliot Thomas Pybus came from England and immigrated into the United States of America.
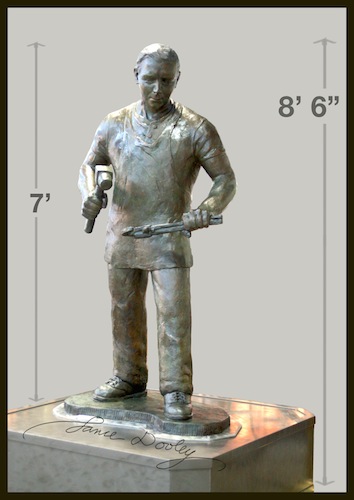
The sculptor Lance Dooley was chosen to create a 7 foot tall sculpture of ET Pybus. The bronze cast stands seven feet high and is mounted on a steel pedestal of one and a half feet high, making the total height of the sculpturee eight and a half feet. |
|
Click here for Article in Wenatchee World - April 23, 2013
Click here for Article in Wenatchee World, Recapping Summer 2013 - Oct 4, 2013
Click here for King 5 TV report on Pybus Market

Youtube Video of Informative Lecture given to college students on June 3
click to watch ... ET Pybus Sculpture EarlyStage Part 1 of 2
click to watch ...ET Pybus Sculpture EarlyStage Part 2 of 2
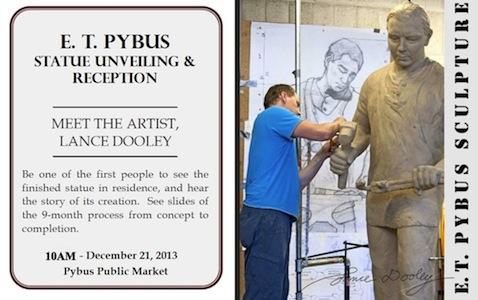 photo credit: Robert DeTorres
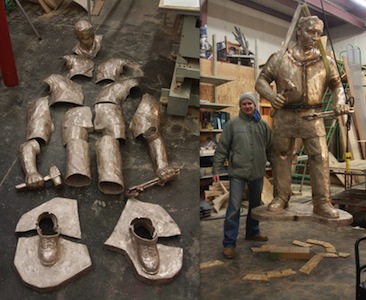
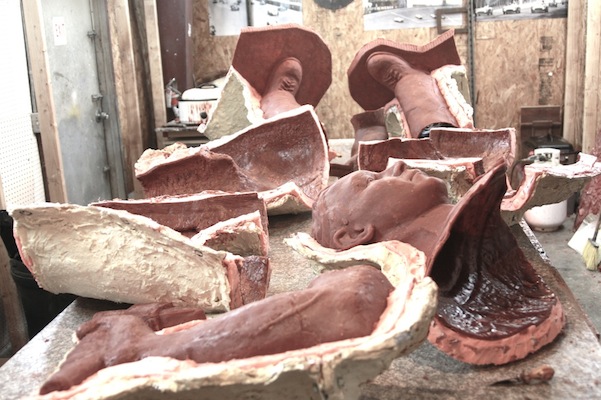
12-13-2013 FOUNDRY ASSEMBLY OF BRONZE
After each piece of the sculpture is cast, it must be sand blasted and any mating edges must be worked on so they align correctly.
The separate pieces are slowly welded together to create the entire sculpture.
Because of the weight of this sculpture, a hoist with heavy duty wraps were used to manipulate the positioning of the sculpture as it
is worked on.
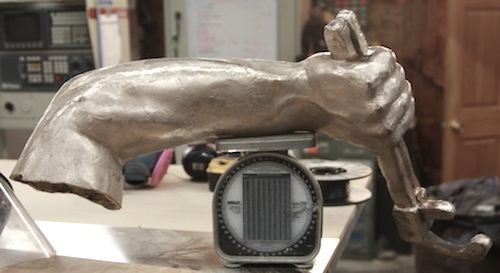
12-12-2013 FOUNDRY WEIGHING BRONZE
The bronze cast for one of the arms is put on a scale and found to be 30 lbs.

12-11-2013 PEDESTAL DONE
The pedestal was built at a local metal shop. It weighs around 300 lbs and it is overengineered to be capable of holding around 6,000 lbs.
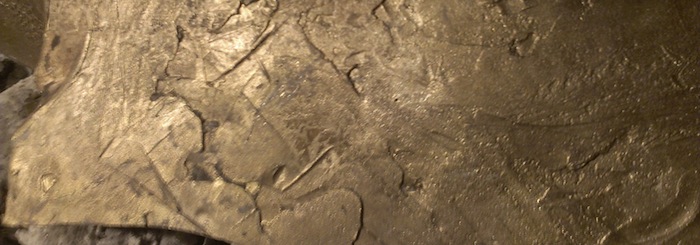
11-25-2013 FOUNDRY BRONZE SURFACE
After the ingots are melted at a temperature of over 1700F, the molten bronze is poured into the narrow cavities encased by the silicon hard shell.
After a period of cooling time, the hard shell is removed and for the first time we can see the bronze surface of one of the pieces of the sculpture.
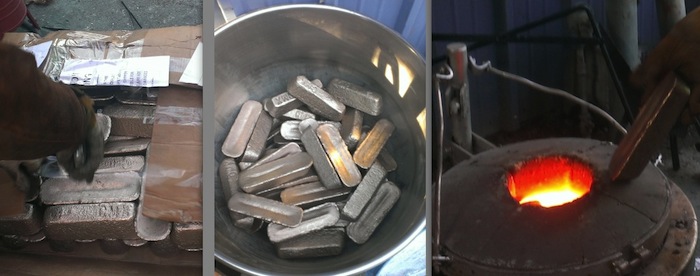
11-23-2013 FOUNDRY BRONZE INGOTS
A crate of bronze ingots is delivered to the foundry.
The ingots are transferred into a temporary holding container, where they can be inspected and weighed.
The ingots are fed into a gas-fired cauldron where the are melted down at a temperature over 1700F.
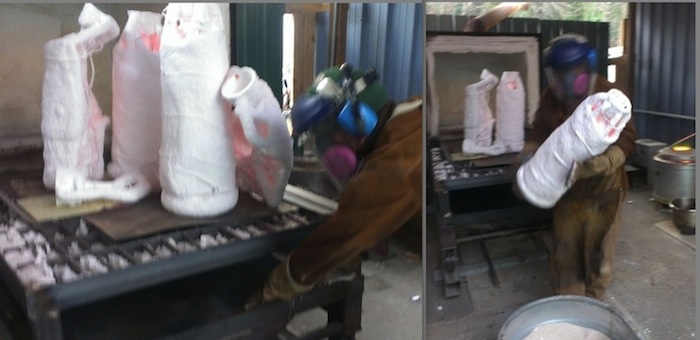
11-23-2013 FOUNDRY BURN-OUT KILN
Each wax shell (with it's gating system) has been coated with high strength silicon matter that has formed a shell.
Each piece is then put in what is called a burnt-out kiln, which melts the wax out of the shell.
Each piece is then removed from the burn-out kiln and placed on the ground or in a bucket of sand, where it awaits to recieve
the gravity fed molten bronze pour.

11-06-2013 FOUNDRY WAX GATING SYSTEM
At the foundry, the Wax Gating System is just about complete.
Each wax shell corresponding to the entire body of the sculpture is outfitted with a network of external wax tunnels.
In this photo, we are looking at the upper back and shoulder piece of ET Pybus.
Under the wax shell and tubes is the mold I made in Sept.
Later, the entire wax system will be coated with a heavy duty fireproof material (the investment) about an inch thick that turns rock hard
The wax is then melted out, leaving cavities and tunnels.
Then, molten bronze will then be poured into the two cup-like things at the top of the photo and flow through the network of empty spaces (where the wax was) and that creates the bronze cast.
10-26-2013 FOUNDRY WAX POUR
The ET Pybus Sculpture project is now at the foundry in Seattle.
This photo shows the molds that Lance Dooley made in September and how they are being used to create wax shells corresponding to each segment of the body.
This is part of the Lost Wax Casting process.
Each piece will be individually cast in bronze and then all the pieces are welded together
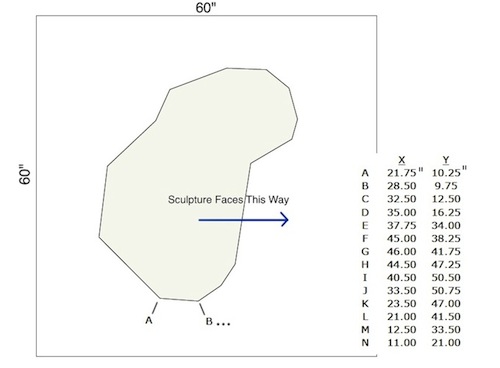
10-24-2013 PREPARATIONS FOR PEDESTAL
Now we must shift attention to creating an adequate pedestal for the sculpture.
I took some measurements of the contour line going around the bottom of the sculpture and converted to cartesian coordinates, with
reference to the 5'x5' square base. We will have to do some weight calculations and also factor in how people may use the pedestal
as a bench.
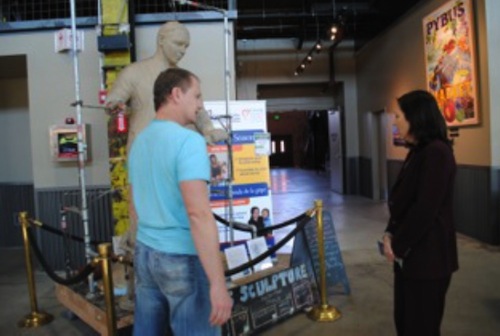
10-23-2013 IMPORTANT VISITORS
The project is now waiting for the foundry to finish the bronze cast and then it will be installed in the market around Dec 19th or Dec 20th.
Meanwhile, I give slideshow presentations on the project to groups and occasionally we have important visitors from out of town.
Today we had United States Senator for Washington State Maria Cantwell visit Pybus Market and I was able to give a short rundown on the Pybus
Sculpture Project.
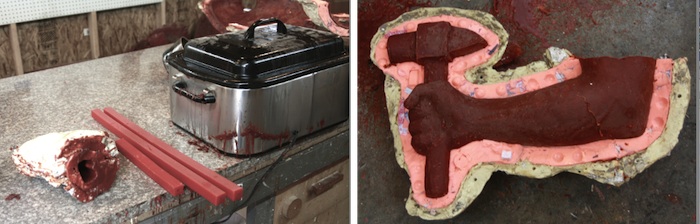
10-18-2013 FOUNDRY WAX
I visited the foundry this weekend and wax castes are being poured for each piece of the multi-piece mold.
Here we can see some wax sticks being melted in a cooking pot.
Then, the wax is poured into the mold and the mold is taken apart. Now we have a wax arm.
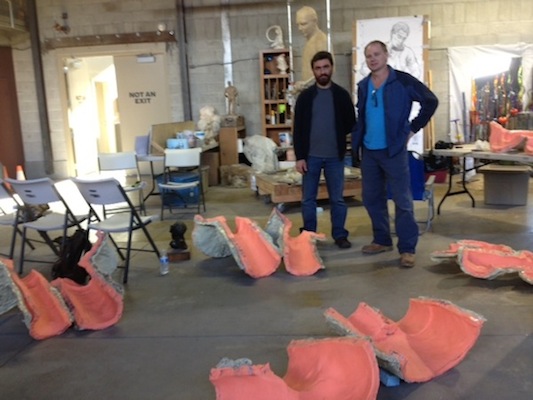
9-25-2013 FOUNDRY PICK UP MOLD
Today the foundry owner came to pick up the mold. Ion and myself are standing here checking to make sure all the pieces are
accounted for.
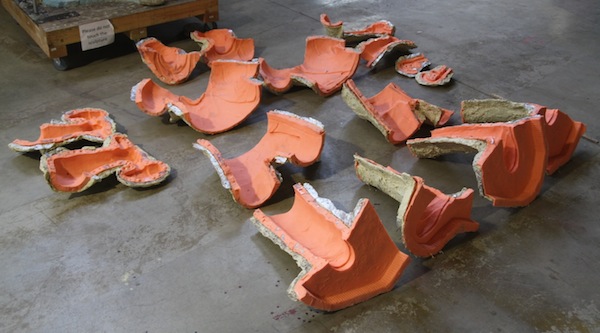
09-24-2013 MOLD MAKING ... DONE
The entire mold for the sculpture is now done and has been removed.
I placed the pieces on the floor in front of the sculpture.
There are 16 major pieces, of which several are comprised of smaller pieces.
The foundry owner will be on-site this Wednesday to pick up the mold and transport it to Seattle.
It is a huge relief to have the mold done and if you know anything about mold making then you will look at this photo
and be glad it wasn't you who had to do this part of the process.
09-08-2013 MOLD MAKING ... Continued
Still making forward progress on the mold. I have completed about 95% of the soft shell mold.
But, I must put the hardshell on the right arm and then remove the mold from the right arm and then cut the right arm off so I
can access the torso in that area.
Concurrently, I am working the hard shell on other areas, building a section at a time.
There are 20 different sections that I have numbered for systematic purposes. It can be easy to get lost on large technical tasks, so it is
alway best to break things down and do everything in an orderly fashion.
09-05-2013 MOLD MAKING
The clay sculpture is finished and I am now 3 days into the mold making process.
The mold making process entails adding a coat of silicon (or other flexible material) over the entire sculpture and then adding a hard shell material over that.
The soft and hard shells comprise the mold in total.
In this photo you can see a silicon material called Rebound 25 that is in the process of being applied in thin layers.

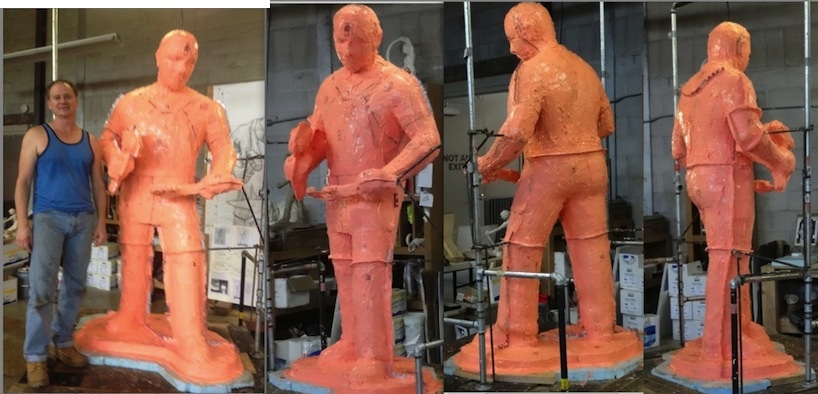
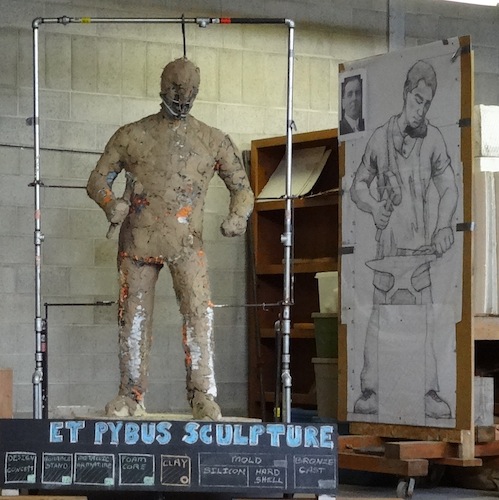
08-29-2013 CLAY DONE
The clay sculpture is done, but I still tinker with it until Monday Sept 2nd when I will begin the mold making process.
A lot of the previous photos make the sculpture look flattish, but in fact the surface of the sculpture has quite a bit of surface
activity. The patination process (coloration/oxidation) will make this very evident after the bronze is cast.

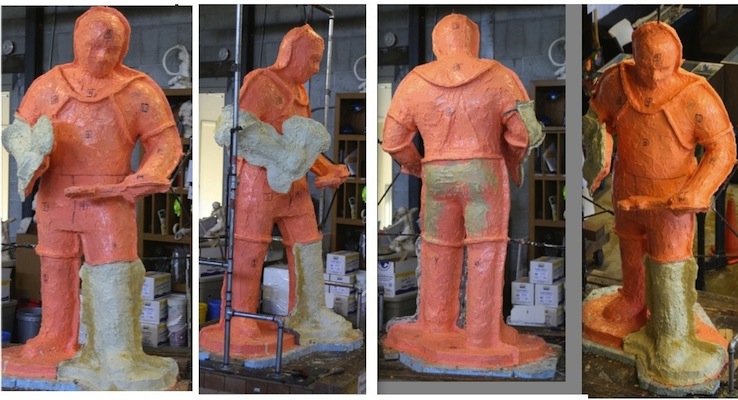
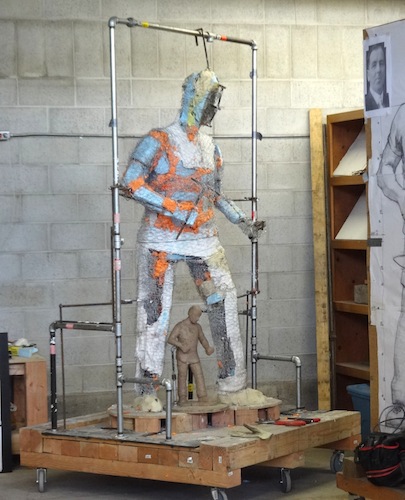
08-08-2013 OVERALL ASSESSMENT
This sculpture project is 3 weeks away from the "clay finish" date.
I am spending more time than ever standing back to make sure patterns in clothing and definition in all forms read properly from
a distance.
The plinth is being developed in order to properly terminate the sculpture on the bottom. I am doing this by cutting
blue contractor foam and placing it under the particle board at the bottom of the sculpture and then I will cut
a series of boards such that the vertical distance to the top of the boards is approximately 3 inches.
Putting a lot of thought now into the mold making process, which will begin around the first week of September.
In the photo above, I am standing next to the sculpture.
I am 5'10.5"
The sculpture is 7 Feet high.
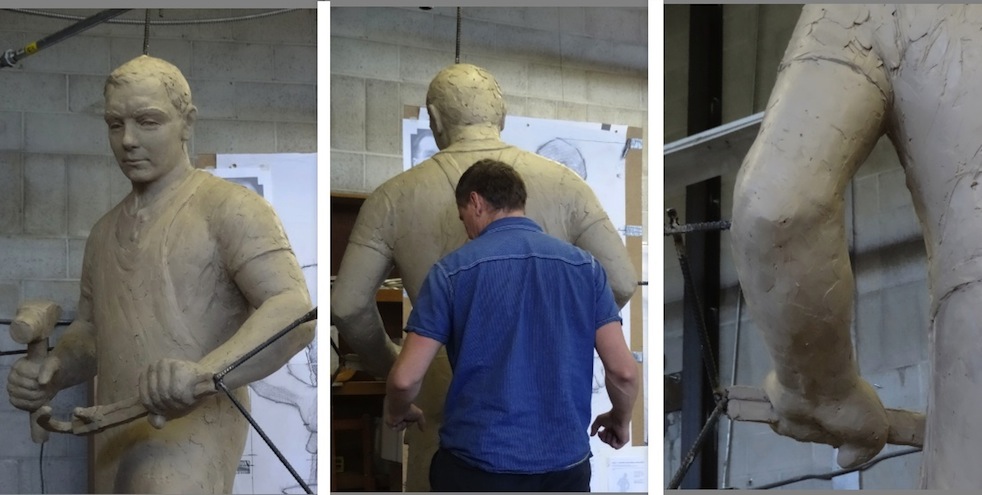
07-28-2013 TORSO & ARM REFINEMENT
From photographs and reports from his descendants, ET Pybus had very developed forearms.
The project is continuing to head towards a clay-finish-day at the end of August 2013.
I have had a chance to shape the arms and especially the forearms to reflect the strength a blacksmith has when holding heavy metal tools all day long.
The picture on the left side of the composite (above) shows how the portrait has continued to be refined and the apron and clothing are beginning to
show the correct wrinkle patterns.
The picture in the middle of the composite (above) shows me standing directly behind the sculpture, so the audience can get a sense for
size comparison.
The picture on the right of the composite (above) shows the left arm and how I am striving to capture the correct muscle & bone anatomy.
I prefer to keep the detail low, but aim for correct shapes and bulk.
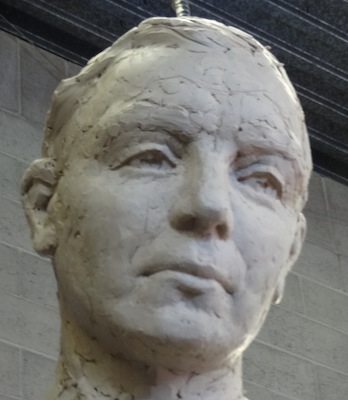
07-15-2013 STRUCTURE OF THE PORTRAIT
With the body fully blocked in, I can spend a little more time on developing the portrait.
On the portrait, it is very important to create the
proper structure of the skull before working on any features.
Analyzing the portrait from the front, sides and rear are the best way to
create a properly structured portrait.
The eyes are developed along with all the feature at the same pace, so nothing gets ahead.
I will use the same technique as Michelangelo did on "The David" for development of the eyes. The clay representing the highlight that spans across
the iris and pupil will be at the same level as the clay for the whites of the eyes.
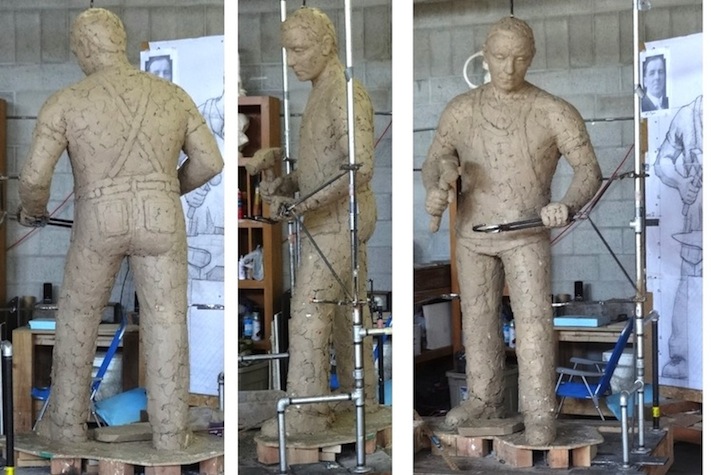
07-09-2013 EVERYTHING IS IN PLACE
Yesterday I did some more support welding and put in place the tongs and horseshoe (which are welding together for stability).
I have a blocked in portrait that is mainly a placeholder so I could properly analyze how the head neck & shoulders proportionately fit in with the entire body.
I will spend the next could of days making some adjustments to the left leg so it's muscle masses are showing through a bit more and the lower left leg needs a bit more material hanging from it.
I'm still playing with the arrangement of the suspenders in back, the belt, pockets in back of pants, the boot details and all the accessories by drawing them directly onto the clay.
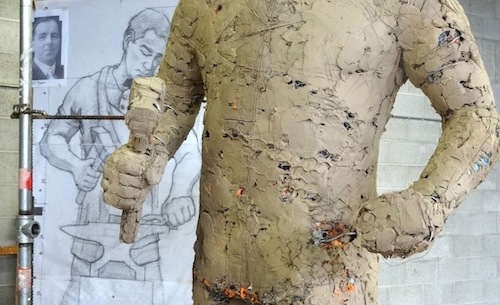
06-20-2013 BLOCKING IN HANDS
I continue to apply clay intelligently in order arrive at a proportionate block-in of the blacksmith figure of ET Pybus.
This photo shows the hands and how I go about blocking them in.
Delineating where the rows of knuckles exist is done by drawing directly on the clay.
06-15-2013 INITIAL CLAY APPLICATION
I began to apply the oil based clay to the sculpture, but the figure seemed a little too stout.
I made the decision to dig into the foam and fence wire wrappings and thin down the torso a bit, as well as slim down the foam core that
was representing the deltoids and some of the arm mass.
I re-applied clay in those areas, as well as a layer of clay up and down the entire body.
More time was spent wrapping bendable aluminum wire around the portrait sections.
I am now well under way in the clay application phase, as seen by the chalk board sign I made at the bottom of the photo.
When visitors walk into the workspace area, they first see the 7 foot wide sign, with the phases of the project in diagram format.
At this point, I have added about 75 lbs of clay and I will use the clay as a canvas that can be drawn on to continue refining proportions and gesture.
05-29-2013 FOAM CORE and SURFACE SUBSTRATE
I am now completley done with the metallic armature and have created a mulit-material surface substrate which will allow me
to finally begin adding clay to the sculpture.
The surface substrate was created with a mixture of: hexagonical fence wire, expanding foam, cut insulation foam and sprayable foam used for fire retardant duct work.
The logic behind all of this is to create a primitive surface form that comes close to, but not all the way to the actual surface of the true form.
It should be noted that most of the volume of the sculpture is actually hollow, or filled in places with low weight foam.
This is a procedure used to create large sculptures, while keeping the weight lower and hence safer.
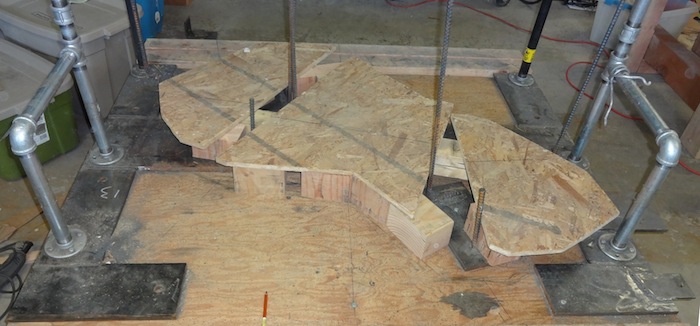
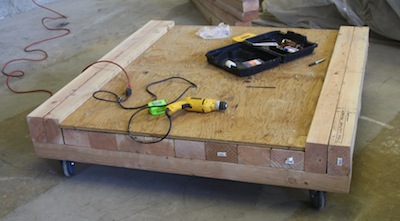
05-06-2013 BUILDING THE BASE
After the metallic armature was finished, I had to create the virtual ground upon which the sculpture would be standing on
Another name for this is called the "plinth".
I built a wooden plinth by using wooden beams that support an irregularly shaped cut out particle board.
I had to cut out portions of the particle board so it would allow the Iron-Rebar to stick through it.
All the while, I had to calculate where the perimeter of the figure's feet would be on the particle board.
This photo also visually shows how the galvanized orchard pipes are bolted onto the steel plates. The bolts go through the flanges, then through
the large sheet of plywood and finally into the 4"x6" cross sectional wooden beams that are the actual floor of the rollable sculpture stand.
Knowing a bit of carpenty as well as metal working can go a long way in the world of sculpting.
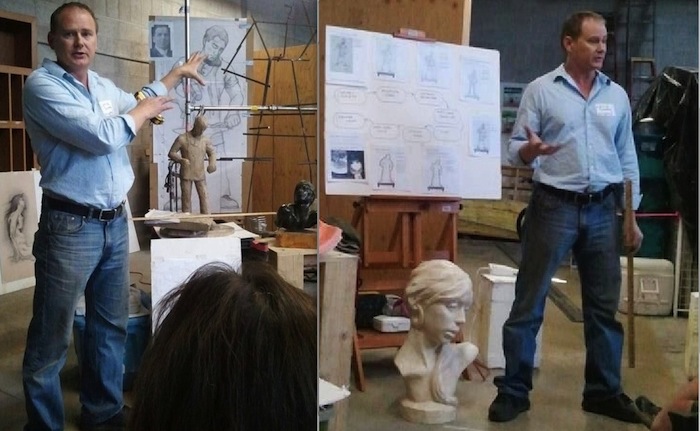
04-24-2013 FIRST PUBLIC LECTURE
This night was a pre-opening event for Pybus Market and there were about 300 people who showed up.
I spoke in front of a gathering of people to say a little bit about the sculpture project I am
embarking on; dimensions, materials, timelines, etc ...
Most non-sculptors usually have no idea all the different steps involved in creating a large scale sculpture, and it was good to explain to the
public for the first time what I was doing.
This speech would later be repeated hundreds of times as legions of people come through my studio for the remainder of the project.
04-21-2013 INTERNAL ARMATURE
Several weeks have now passed from the last photo and this image shows the construction of the internal metallic armature.
I worked with sections of 3/4" Iron Rebar, a 90 AMP Sears MIG welding machine and a grinder with metal cutters and buffers to slowly build what is perhaps the
most important part of the figure sculpting process: the armature.
The workspace is now becoming filled with tools and accessories to accomodate everything I need.
I made a small, very low detail clay maquette to make sure I understood the gesture and proportions of the pose and place it on a fold out work stand.

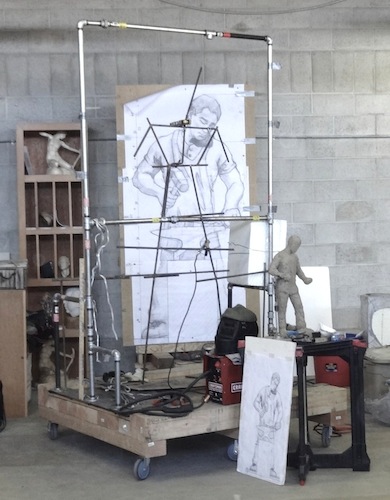
04-01-2013 EXTERNAL ARMATURE FRAMEWORK
Given the size of this project, it was obvious that I would need to create a very sturdy metallic armature that would hold the sculpture up.
But, because my primary metal was 3/4" Iron Rebar, I though it best to create an additional (external) armature.
I chose galvanized orchard/plumbing pipes as the external armature.
I bolted the 1/2" plate steel to the sculpture stand and welded on some additional plate stell to form a giant letter "H".
Connecting the galvanized pipes together and bolting them with flanges into the plate steel created what I nicknamed "the roll bar".
Also notable, is a 7 foot blown up versio of the original concept design for the sculpture drawn in an orthogonal viewpoint manner.
03-29-2013 AQUIRED METAL FOR ARMATURE
I spent a few days walking around the Pybus Market Construction site and cannibalized from piles of Iron Rebar and any plate steel I could find that
was thick enough to serve as a stabilizing metallic layer.
Of particular importance was a 1/2" thick 5 foot long section of plate steel.
I carried it across the construction yard through puddles of water.
It was about 150 lbs and I had to drop it on the gravel a few times to recover.
Eventually I arrived at my work space
destination and I put it and the iron rebar on top of the sculpture stand with my circular saw and drill.
This was a good load bearing test to make sure I bolted the wheels securely under the sculpture stand.
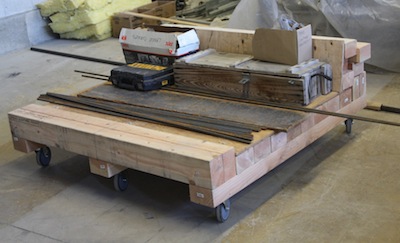
03-25-2013 SCULPTURE STAND
Any good sculpture project begins with a sculpture stand.
This sculpture stand is 5x5 feet and has 6 wheels with load bearing capacity of 350 lbs each.
After 200 lbs of 4"x6" cross sectional beams are bolted together, the load capacity of the sculpture stand is now about 1900 lbs.